Shopping List
Write a list component that allows users to add and delete items.
Environment
Use the environment you are most comfortable with. I recommend using create-react-app to create a local version of the project so that you can inspect the DOM easily from your browser when debugging. Alternatively, you can work from a blank React template in CodeSandbox. Starter code is provided after the problem specification.
Specification
Write a functional component to render a list of items along with their prices. Above the list, there should be two input fields that allow the user to enter a string and number and append a row to the list on submit. To the right of each row, there should be a button that allows the user to remove that row from the list. The complete component with three items in the list is shown below.
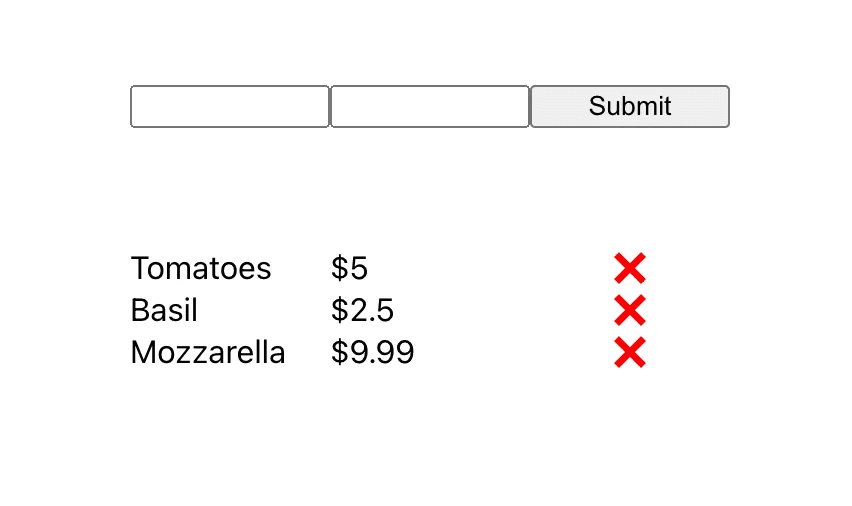
Ensure that both fields are populated before the user can submit their entry. Moreover, do not allow number values less than zero or more precise than two digits after the decimal. In the value column, append a dollar sign before each number.
Starter Code
Here is some code to get you started. The three-item list displayed in the image above is included as a constant in the starter code in case you would like to make use of it for testing. In the solution code, the component is initialized with this constant.
import React, { useState } from "react";

const INITIAL_LIST = [
  { name: "Tomatoes", value: 5.0 },
  { name: "Basil", value: 2.5 },
  { name: "Mozzarella", value: 9.99 },
];

function App() {
  return <ItemValueList />;
}

const ItemValueList = () => {
  // YOUR CODE HERE
};

export default App;
Solution
import React, { useState } from "react";

const INITIAL_LIST = [
  { name: "Tomatoes", value: 5.0 },
  { name: "Basil", value: 2.5 },
  { name: "Mozzarella", value: 9.99 },
];

function App() {
  return <ItemValueList />;
}

const ItemValueList = () => {
  const [list, setList] = useState(INITIAL_LIST);
  const [newName, setNewName] = useState("");
  const [newValue, setNewValue] = useState();

  const onSubmit = (e) => {
    e.preventDefault();
    setList([...list, { name: newName, value: Number(newValue) }]);
    setNewName("");
    setNewValue();
  };

  return (
    <div
      style={{
        display: "flex",
        flexDirection: "column",
      }}
    >
      <div
        style={{
          display: "flex",
          flexDirection: "row",
          justifyContent: "center",
          margin: 60,
        }}
      >
        <form onSubmit={onSubmit}>
          <input
            type={"text"}
            value={newName}
            required
            onChange={(e) => setNewName(e.target.value)}
            style={{ width: 92 }}
          />
          <input
            type={"number"}
            required
            value={newValue}
            min={0}
            step={0.01}
            onChange={(e) => setNewValue(e.target.value)}
            style={{ width: 92 }}
          />
          <input type={"submit"} style={{ width: 100 }} />
        </form>
      </div>
      {list.map((item) => {
        console.log("working");
        return (
          <div
            style={{
              display: "flex",
              flexDirection: "row",
              justifyContent: "center",
            }}
          >
            <div style={{ width: 100 }}>{item.name}</div>
            <div style={{ width: 100 }}>{"$" + item.value}</div>
            <div
              style={{ textAlign: "center", width: 100 }}
              onClick={() => setList(list.filter((ele) => ele != item))}
            >
              ❌
            </div>
          </div>
        );
      })}
    </div>
  );
};

export default App;
As far as formatting, I chose to use organize plain divs into rows and columns using flexbox. You may have used an HTML table, CSS Grid, or any other method — all are fine as long as the component appears as specified. As far as logic, I first set up state variables to store the current list (initialized to the given constant) as an array of objects that each include a name and value. I also set up state variables to hold the user’s input, though you can achieve the same effect by using the HTML input tag’s internal state. All of the logic vetting the user's input, including ensuring both fields are required and that the value given meets the standards in the specification, is handled using attributes passed to the input tags. On submit, we prevent the default form submission behavior (a page refresh, which would reset the component), and we append the submitted item to the list. Finally, the component makes use of two fundamental native functions for programming in React. The map() function is used to iterate over the list array and render each row in the table, and the filter() function is used to remove the corresponding object from the list when its button is pressed.